How to disable automatic windows 10 updates permanently. Pause Windows Update Download Using Command Prompt
The Microsoft team working on the development of the Windows 10 operating system provides users with updates to fix bugs, make fixes and add new features.
You can permanently and completely disable Windows 10 Home (home version), pro updates on your computer/laptop , update assistant or if you have an enterprise version.
At the same time, it doesn’t matter what version of Windows 10 you currently have: 1709, 1703, 1607 or 1511 - 64 bit / 32 bit.
Automatic updates are installed by default, while on Windows 10 Home you cannot disable this service as standard, but there are still some ways.
If you are a Home Edition user, we can only block system updates - Microsoft has significantly limited the user's ability to apply its solutions in the Home Edition.
To do this, launch “Settings” and go to “Update and Security”. Then click “Windows Update” on the left, and then “Change activity period” at the bottom of the screen.

Now you can specify at what hours you actively work with your computer or laptop, which will allow you to limit this system function at this time, so that your computer or laptop will not slow down.
The first method is to disable Cent Update updateWindows 10Pro and enterprise
Users of more powerful versions, such as Professional or Enterprise, can use the Local Group Policy Editor to disable the loading of system add-ons.
If you manage multiple devices, you can make changes at the domain level, which allows us to change the settings of all computers at once.
In Windows 10 Pro, Enterprise, and Education, you can disable automatic downloading of updates using the Local Group Policy Editor. To run them, press “Win + R” and enter in the window.
In the editor, go to “Computer Configuration”, then “Administrative Templates” (right), now “Windows Components” and select (double-click) “Windows Update”.

Now you need to find the “Set Automatic Updates” option and double click on it to start editing.

Then on the left select "Disabled" and select and click OK. That's it, now you have to download and install them manually. This solution is not recommended by Microsoft.
Method two to permanently disable automatic updating of Windows 10 through the registry - step by step
We can also disable the Windows Update service using Registry Editor for this purpose. Using a magnifying glass or window, run the regedit command.
We find a DWORD value called Start, which is located in the key: HKEY_LOCAL_MACHINE\SYSTEM\CurrentControlSet\services\wuauserv

We edit the DWORD value and enter the following in the Value field:
- 2 - Automatic launch of Windows Update Center
- 3 - Manual start
- 4 - Windows Update is disabled.
After placing the appropriate number, click OK and restart your computer.

After you restart your computer, the automatic detection, downloading, and installation of the latest updates for Windows and programs installed on it will be disabled.
Method three to disable Windows 10 constant updates via PowerShell - step by step
You can disable the Update service using PowerShell commands. PowerShell is almost the same as the command line and even better (an updated version of the command line).
Identical effects like the ones above can be achieved using PowerShell commands. To do this, first launch the PowerShell application with administrator rights by typing PowerShell.
In the window that opens, enter the command: stop-service wuauserv

After issuing the specified command, the Update service will be stopped. Additionally, you can also change the service startup type.
To get the service to start automatically, enter the command: set-service wuauserv -startup automatic

This command will change the service startup type to automatic. You can also manually start the Update service by running the command: set-service wuauserv -startup manual

The selected command will change the service startup type to manual. You can also completely disable service startup using the command: set-service wuauserv -startup disabled.

The specified service startup type is disabled.
Method four to disable downloading windows 10 updates using the Services tab
You can open the Service snap-in using Run by running the command: services.msc
In the window that opens we find a service called “Windows Update” (almost at the very end).
By double-clicking the mouse, call up the Windows Update properties window and change the startup type to “Disabled” (or manually) and click the “Stop” button.

From this point on, the Windows Update service goes into standby mode.
Method five to disable completely forced Windows 10 update using the program

The better to use the program. You could say everyone. With its help, you can completely disable any damn updates: Security Center, pirated build checks, and pop-up ads.
But it is unlikely that you will be able to disable the update of the defender, store, nvidia video driver, p2p distribution, reboot, autostart or Skype.
The program is the fastest, easiest and most effective way. All you need to do is download, install, select the disable tab, check the box and click “Apply now”.
How to speed up downloading updates
The service responsible for installing add-ons in Windows 10 is “Center....”. They are received from Microsoft servers and from users’ computers through p2p distribution who already have them - this speeds up the whole process.
Go to Settings and select the Update & Security option. In the "Center..." section you will see the settings. Click Advanced Options.
Then click “Select delivery method.” Enabling the "...from multiple locations" option causes them to download faster, but also send directly to other computers.
You can limit this process to your local network or allow downloading and uploading to the network.
Why you should update your operating system
New malicious codes are created every day. Viruses, worms, Trojan horses, and other pests spread quickly and exploit vulnerabilities in operating systems and applications.
There is still a race of cybercriminal programmers. Developers are developing add-ons to protect users from malware.
This is why installing them to improve security is so important, and why not installing them increases the risk of a successful attack.
But this is not the only reason why you should monitor the system. They also solve hardware and software problems, thereby improving the quality and comfort of working with the system.
Is it dangerous to disable Windows 10 system update?
The update service is responsible for providing improvements. If you disable it, they will not be downloaded or installed.
You can disable downloading without fear, especially if you are using a reliable antivirus.
Receiving a cumulative security update for ordinary users is usually of no use - corporations need it much more.
I always turned off their downloading on Windows 7, but I don’t do this on Windows 10, because in addition to the critical cumulative additions, the version of Windows 10 is also being improved, and I don’t want to miss this, since there are much more new functions then.
Can you go back to the state before the update?
This is only possible within 10 days from the installation date. Under System Settings, click Update & Security, and then on the left side of the window, click Recovery.
There, find the "Return to previous compilation" option. If no more than 10 days have passed since installation, you can begin recovery.
If necessary, you can also return the system to its original state (you can use a rollback).
Then, depending on the option you choose, your files can be kept or deleted - the system will be reinstalled. Good luck.
Despite the long period that has passed since the release of the first versions of Windows 10, the system is still not ideal and requires updates. By default, it will download and install the latest versions on its own, and this in some cases leads to unpleasant consequences.
Why you shouldn't disable updates
Before moving on to methods that will lead to deactivation of auto-update, you need to know the consequences. The main disadvantage of these changes is that you will no longer receive the latest versions of the system. Of course, you will still have the ability to manually initiate the update process at the most appropriate time, but if you don't do this consistently, you will end up with outdated Windows.
The system gains access to new features and increases the level of protection
Updates are released for two purposes: to fix noticed errors or add new features. Accordingly, a user who has not installed the latest version of the operating system is not only left without innovations, but also exposes himself to danger, since not only Microsoft, which is trying to fix them, will learn about existing errors, but also attackers. Therefore, people who store important data on a computer and want to work with the latest innovations are not recommended to refuse updates.
Why you should disable auto-update
Those who have little free space on their hard drive should refuse to receive updates, as downloading them can lead to it becoming full. However, in this case, it is better to try to clean the disk or replace it with a larger one.
Downloading updates is an automatic procedure, so it is very difficult to control the traffic spent on downloading files. Some versions weigh more than 100 MB, which can lead to bandwidth consumption and high costs if the Internet is paid for per megabyte. But the creators of Windows provided for the possibility of such a situation by adding a special function “Limited traffic”, which allows you to configure the download procedure in more detail (for more details, see the subsection “By setting up limited traffic”).
Another reason that makes you want to disable auto-update may be the time independently selected by the system. Since a reboot is required to complete the installation of updates, the system, having received the necessary files, will prompt you to restart the computer many times, assigning some time or letting you do it. Sometimes you can miss such a notification or accidentally acknowledge it, which will lead to an immediate or unexpected reboot. Because of this, the work process will be interrupted, and unsaved files may be damaged.
 The system constantly prompts you to reboot.
 There are reasons why you should refuse auto-updates, but if you can ignore them, then try to make sure that you don’t have to prohibit automatic receipt of updates. For example, I set a certain time through the system settings at which the system can randomly reboot if necessary. Since the set period is late at night, restarting the computer does not bother me.
Deactivating auto-update
There are many ways to prevent the system from downloading and installing updates without your consent. Some of them allow you to disable some updates, and some allow you to disable absolutely everything. First, the simplest and most accessible methods will be described, and then those that should be resorted to only if the first for some reason did not help.
By disabling the service
- Press the Win+R combination to launch the Run window. Write and send the services.msc command for execution.
 Execute the command services.msc
 - The list that appears will display all the services available in the system. Find the update center process among them and double-click on it with the left mouse button.
 Open the update center service
 - Set the startup type to Disabled and stop the service. Save your changes. Done, since the service responsible for checking and downloading new versions is now inactive, auto-update will not be enabled.
 Set the value to “Disabled” and stop the service
If you want to start receiving updates again in the future, go back to the service above, start it and set the Startup Type to Automatic.
Via PowerShell

If in the future you want to start receiving updates again, go to the task scheduler (how to open it and work with it is described in the subsection “Through creating a task”) and delete the task created by the above command.
Via Group Policy
The peculiarity of this method is that it is available exclusively to users with Windows 10 Enterprise and Pro. Owners of the “Home” edition will not be able to use this method, since this version of the system does not have a Group Policy Editor.
- Use the system search bar to find the Local Policy Editor and open it, or use the gpedit.msc command.
 Execute the command gpedit.msc
 - Go to the “Computer Configuration” folder, and then to the “Administrative Templates” - “Windows Components” - “Windows Update” subfolder. When you reach the final section, open the “Setting up automatic updates” file.
 Open the file “Setting up automatic updates”
 - Set the value to “Disabled”, thereby preventing the computer from using auto-update. Save all changes you have made.
 Set the value to “Disabled”
If you want to start receiving updates again in the future, go back to the file and set it to Enabled. This will be enough to return the Update Center settings to their original position.
Via the registry
The method described below is similar to the previous one, so it is also not suitable for owners of Windows “Home”, despite the fact that the registry is available in it. We will change the file parameter described in the sub-item “Through Group Policy” through the registry. The result will be the same, but the steps are different:

If in the future you want to start receiving updates again, delete the created file or set its value to 0 (zero), thereby disabling it. Please note that you can only delete it; changing any other files will lead to system failure.
By installing a metered connection
This method is relevant for all editions of Windows, but it does not limit all updates. New versions that improve security will still be downloaded. If you are satisfied with this condition, follow these steps:
- Expand PC settings.
 Open computer settings
 - Going to the “Network and Internet” block, select the Wi-Fi sub-item and expand additional parameters.
 Open additional Wi-Fi settings
 - Activate the “Limited connection” function. Done, most updates will now be ignored.
 Activating a metered connection
If you want to start receiving updates again in the future, go back to advanced settings and deactivate the feature.
Disabling certain versions through a third-party program
There are several programs available to make managing updates easier. One of them is Show or Hide Updates from Microsoft. Using it, you can prevent the installation of certain updates, and not all at once. It is worth downloading from the official website, where it is distributed free of charge and weighs only a few megabytes.

If you want to allow the installation of hidden updates, return to the beginning of the program and select the “Show updates” option. The app will show you which updates are hidden, and you can make them visible again.
Via Win Updates Disabler
You can prevent the installation of updates using the free, simple utility Win Updates Disabler. It is enough to download it from the manufacturer’s official website, check the Disable Windows Update checkbox and start execution. You can enable disabled functions in the Enable tab.
 Activate the Windows Updates Disable feature
 Via Windows Update Blocker
A program similar to the previous one, but with one difference – you will have to pay for it. Having purchased a product on the official development website, you can download the application, open it, check one box and start the blocking procedure. Using it you can also turn on auto-update again.
 Activate the Disable Service function
 Via Winaero Tweaker
A more functional program, and it is free. Using Winaero Tweaker, you can change the appearance of the system and configure the operation of many services, including the update center. After launching the program, go to the Windows update setting sub-item and click on the Disable Windows Update Service button. Done, auto-update will be disabled. You can enable it by resetting the update center settings - the Reset to defaults button.
 Go to the Windows Update Setting section and click the Disable Windows Udpate Service button
 Through the update center settings
- While in the computer settings, select the “Update and Security” block.
 Select the “Update and Security” block
 - Without switching the “Update Center” sub-item, expand additional options.
 Click on the line “Advanced options”
 - Prevent downloading updates for other Microsoft products. By disabling this feature, you will prevent the system from downloading updates for applications from the Microsoft Store. Proceed to select how you want to receive updates.
 Uncheck the option “When updating Windows, provide…”
 - Activate the “Delay updates” feature. It does not disable auto-updates, but only delays the download of released updates for several weeks or months. It is needed primarily for those who are concerned about the security of their system and want other users to test the updates on themselves first. However, versions responsible for improving security will not be delayed. Click on the line “Choose how and when to receive updates” again.
 Enable the “Delayed updates” feature
 - Disable receiving files from multiple locations. This will help you save traffic, since from now on you will not distribute downloaded updates.
 Disable the “Allow downloads from other sources” feature
Video: Disabling Windows Auto-Update
Prohibition on driver updates
In addition to updates for the system and applications, Windows downloads new versions of drivers necessary for more correct operation of the devices and computer components used. If for some reason you do not want to install the latest drivers, follow these steps:

You will still be able to download drivers manually and install them yourself. But if you want to return the system’s right to automatic updates, then launch this window again and change the parameters to the default values.
You can prevent Windows 10 from updating itself in different ways. Some of them will allow you to disable receiving absolutely all variants of new versions, others - only those that are not related to security. But no matter which method you choose, you can always tell the system to automatically look for updates again.
Keeping the operating system up to date is the main task of Windows Update. This function allows the Windows system to be constantly up to date by regularly downloading the necessary files from the official website. And if in early Windows operating systems users had the opportunity to manually adjust the download time and the number of updates, then starting with Windows 7, in particular on the home version, this function is almost completely absent. And if you consider that automatic updates, for example, new versions of individual drivers, can significantly slow down the operation of a computer or laptop, then the question of disabling them is very relevant. In addition to reducing the performance of the OS, unscheduled updates can cause a decrease in speed or an increase in the volume of Internet traffic, which is especially unpleasant when using a limited connection. Thus, understanding where and how to disable Windows 10 updates completely and permanently becomes key for many users of this version. From this article you will learn how to manually regulate the distribution of Windows updates with the Update Assistant, as well as in the Registry Editor.
How to disable updating Windows 10 (home version) completely and permanently - step-by-step instructions with photos
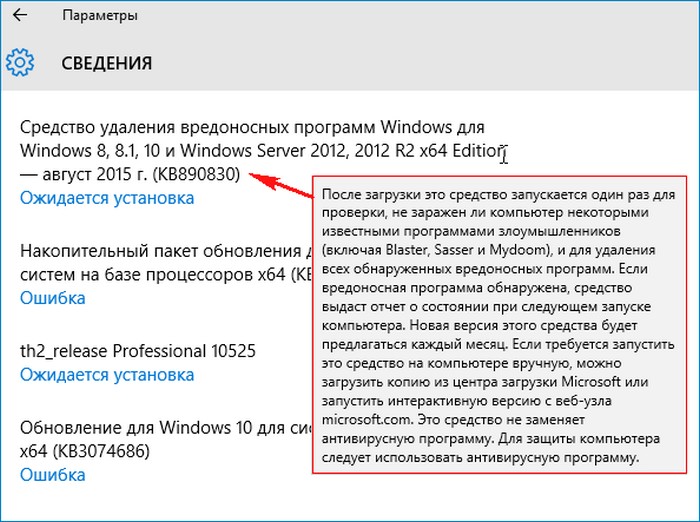
Please note that it is impossible to disable updates on the home version of Windows 10 completely and permanently without using an additional program. But OS developers foresaw the need of some users to manually regulate unwanted updates and, even before the advent of Windows 10, they released a special utility - a tool that allows you to disable updates if necessary. You can download this package for free from the Microsoft Download Center. After installation on a PC, the program scans the OS and shows options for possible updates. The user just has to select the Hide Updates function and Windows 10 will stop automatically downloading these new updates.
Step-by-step instructions on how to permanently disable updates on the home version of Windows 10, photo
Another option for disabling updates on the home version of Windows 10 is to set Internet traffic limits. This is a kind of bypass of the system, since in conditions of limited traffic, Windows 10 cannot download and install updates automatically. This method is suitable for those who use a Wi-Fi connection to the network. To use this option, you need to open the Settings menu and select the Network and Internet section. Then you need to go to the Wi-Fi section and click on “Manage known networks”. From the list that appears, select the name of your Wi-Fi network and go to its properties. Then in “Advanced settings” you should enable the “Set limited connection” option. Ready!


How to disable Windows 10 driver updates in the registry on a laptop or computer - instructions with video
The following method for disabling Windows 10 updates and drivers in the registry on a laptop or computer is suitable for advanced users using the Pro version. Unlike the home version, in the professional version the Windows 10 developers left the ability to disable updates through the Registry Editor. To use this feature, you must enter regedit in the search bar and open Registry Editor. Then you need to go to the section HKEY_LOCAL_MACHINE\SOFTWARE\Policies\Microsoft\Windows.In this section you need to create a new Windows Updates folder and an AU subkey. After in the lastsection create « DWORD parameter"and call it NoAutoUpdate, open and we ask value "1". Ready!

Step-by-step instructions on how to disable driver updates on Windows 10 in the registry on a laptop and computer, video
Another detailed step-by-step instruction on how to disable updates on Windows 10 in the registry on a computer or laptop is shown in the following video.
How to completely disable automatic updates of Windows 7, maximum version - step-by-step instructions, video
You can completely disable automatic Windows updates on the maximum version of Windows 7, which remains a fairly current operating system today. It was with its advent that the developers thought about limiting the user functionality of disabling updates in manual mode. However, disabling automatic updates on Windows 7 yourself is quite simple. To do this, go to Start, select Control Panel - Administrative Tools - Services. Use the mouse wheel to scroll through the entire list of services and click on “Windows Update.” In the window that appears, select the startup type “Disabled”. Then you need to click the “Stop” button, and then “Apply”. That's it - automatic updates won't bother you anymore!


Video with step-by-step instructions on how to disable automatic updates on Windows 7 in the maximum version
The following video shows step-by-step instructions for disabling automatic updates of Windows 7, maximum version.
We hope we were able to answer your question about how to disable updating Windows 10 (home and Pro) and Windows 7 (maximum version) completely and permanently. Now that you know where you can disable the driver update function in the registry and how to use the assistant from Microsoft Update, you can easily regulate the automatic distribution of updates on your computer or laptop.
Hello admin! I have Windows 10 installed on my laptop, I am completely satisfied with the system except for one thing, I can’t disable automatic updates. I work as a manager and travel all day with laptop in Moscow, the Internet is connected via a USB modem and when opening a page of any website the laptop freezes terribly, and after rebooting this window appears with a message“Working with updates. 100% complete. Don’t turn off the computer” and it hangs like that for half an hour,
Apparently the system has received updates and is now processing them, but I’m sitting and stupidly waiting!
It’s a different matter at home, I connect to the router and everything flies. A familiar wizard recommended disabling automatic updates of Windows 10, but how to do this, and is it even possible?
Hello friends! I would advise our reader to switch to a Limit connection in the Wi-Fi settings and Windows 10 will not download all updates in a row. This option is the most acceptable for owners of laptops with Windows 10 installed (details later in the article), of course you can completely disable updates, but the fact is that Windows 10 was released with minor flaws and the upcoming patches should bring the operating system to completion in the next month - two.
Also, do not forget that updates bring important fixes to all components of the operating system, including security; if you use it as an antivirus program, then keep in mind that it will not be updated either. In addition, along with the updates, various tools will come to check your computer for the presence of rootkits and other dangerous malware.
- Note: To be honest, sometimes the opposite happens - updates intended to fix problems lead to other errors. Also, updates may conflict with third-party drivers and programs, which can result in the system freezing and even crashing into a blue screen.
Well, I warned you about everything and let's move on to the most important thing. There are five ways to disable automatic updates in Windows 10.
Switching to a metered connection in Wi-Fi settings
Left-click on the menu Start and click on Options Network and Internet Wi-Fi

Extra options

We put the switch in position Set as metered connection

We completely disable operating system updates in the computer settings
Left-click on the menu Start and click on Options
Go to the section
Update and Security
Windows Update

We see that there are new updates that are immediately installed on our computer
Click the button Extra options

In this tab we disable receiving updates:
Choose how to install updates
Set the parameter Notify when reboot is scheduled
Check the box Defer updates.

Let's take a step back out the window
Update and Security
Windows Update
and we see that updates are no longer downloaded or installed automatically, but are waiting for your permissions. The installation of updates will begin if you click on the button Install now.

Disable updates in Windows 10 by disabling the Windows Update service
Right-click on the Start menu and select Computer Management
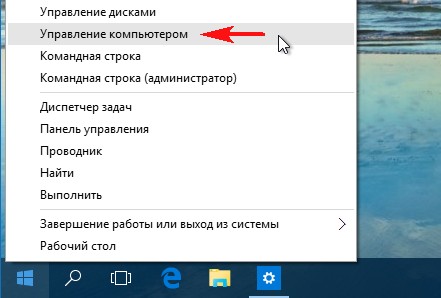
Left-click on the Services item and select from the list that opens Windows Update, double-click on it with the left mouse

and exhibit Startup type to position Disabled.
Apply And OK.


Disabling updates in Windows 10 using the registry
I think this method is unnecessary, but, as they say, everything will do in the household.
Start->Run

Enter the command in the input field regedit
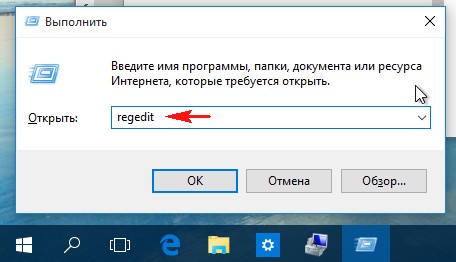
The registry opens. Finding a branch
HKEY_LOCAL_MACHINE\SOFTWARE\Policies\Microsoft\Windows
Right-click on the Windows partition and select New – Partition.

Enter the name of the WindowsUpdate section and right-click on it and selectCreate – Section, enter the name of the section AU.

Right-click on the created AU partition and select New – DWORD Value (32-bit)

We call the parameter NoAutoUpdate and assign it the value 1.

If after this operation you reboot and enter the parameters:
"Update and Security
Windows Update", you will see that the update download failed. Click Advanced options.

As you can see, not a single option for installing updates is available to us.

Friends, the fifth method is to use the Group Policy Editor, if you are interested in it, I will talk about it in the next article.
Updating Windows 10 is a procedure that results in the replacement of old OS elements, including built-in software, with newer ones, which either increases the stability of the operating system and its functionality, or, which is also possible, adds new bugs. Therefore, some users try to completely remove the Update Center from their PC and enjoy the system at the stage that is optimal for them.
Windows 10 OS, by default, automatically checks for updates without user intervention, downloads and installs them on its own. Unlike previous versions of this operating system, Windows 10 differs in that it has become a little more difficult for the user to disable the update, but it is still possible to do this both using third-party programs and using the built-in tools of the OS itself.
Temporarily suspending the update
By default, the Windows 10 operating system has a feature that allows you to defer the download and installation of updates for up to 30-35 days (depending on the OS build). To enable it you need to follow a few simple steps:

Method 1: Win Updates Disabler
Win Updates Disabler is a utility with a minimalist interface that allows any user to quickly figure out what’s what. In just a couple of clicks, this handy program allows you to disable or enable system updates without having to understand the OS system settings. Another advantage of this method is the ability to download from the official website both the regular version of the product and its portable version.
So, to disable Windows 10 updates using the Win Updates Disabler utility, simply follow these steps.

Method 2: Show or hide updates
Show or hide updates is a utility from Microsoft that allows you to prevent certain updates from being installed automatically. This application has a more complex interface and allows you to quickly search for all currently available Windows 10 updates (if the Internet is available) and will offer to either cancel their installation or install previously canceled updates.
You can download this tool from the official Microsoft website. To do this, follow the link below and scroll down a little to the location indicated in the screenshot.

The procedure for canceling updates using Show or hide updates looks like this.

It is worth noting that using the utility Show or hide updates You can prohibit installing only new updates. If you want to get rid of old ones, you must first delete them using the command wusa.exe with parameter .uninstall.
Method 3: Standard Windows 10 tools
Windows 10 Update Center
The easiest way to disable system updates using built-in tools is to simply disable the Update Center service. To do this, follow these steps:

Local Group Policy Editor
It is worth immediately noting that this method is only available to owners Pro And Enterprise Windows 10 version.

Registry
Also, owners of Windows 10 Pro and EnterPrise versions can turn to the system registry to disable automatic updates. This can be done by following these steps:

Conclusion
We'll finish here, because now you know not only how to disable automatic operating system updates, but also how to delay its installation. In addition, if necessary, you can always return Windows 10 to the state where it will start receiving and installing updates again, and we also talked about this.