I can’t log into my Google account: restoring forgotten data, ways to log in after resetting the settings. I can’t log into my Google account: recovering forgotten data, ways to log in after resetting the settings How to remove the unlock key on Huawei and Honor: reserve
Google is actively improving the security of the Android OS and introducing anti-theft protection such as linking the device to a Google account. In this article, we will figure out how to bypass your Google account after a reset.
Before you start re-reading the article! Read the comments first, and then carefully the entire article!
A little background
With each new release of Android, Google tries to raise the level of security of this mobile operating system and introduces new protection mechanisms.
So, with version Android 5.1 Lollipop, a new anti-theft mechanism was added, the essence of which is as follows: after purchase, the owner of a smartphone or tablet links the device to his Google account. If the device is suddenly stolen and the attacker erases all data, he will run into Google Device Protection called Factory Reset Protection or FRP.
But not everything went as smoothly as we wanted, if you bought the phone second-hand or forgot your account and reset it, then naturally you fall for FRP protection. You need to reset your Google account!
Workarounds
Google account after reset
If we consider it globally, there are two options for resetting the protection:
- Official
- Unofficial (bypass Factory Reset Protection)
Let's first look at the official option for resetting FRP or how to avoid this problem when resetting, and then look at all the ways to bypass Factory Reset Protection.
Official FRP Reset/Bypass
- Enter the login and password for the Google account that was before the reset; if the device was purchased second-hand, then ask for this information
- From your computer, go to your Google account settings and
- If you have receipts and warranty cards, contact the service center
- When replacing key modules or the motherboard of a smartphone or tablet
To completely disable Factory Reset Protection/FRP

If after resetting Android does not accept the password
If you try to enter your Google account after resetting your Android settings, but you can’t go any further, then most likely you reset your password not long ago; if this is the case, then wait 24-72 hours, then try again.
Bypass Factory Reset Protection/FRP or how to bypass Google Account? (Unofficial)
Below we will suggest many methods on how to unofficially bypass FRP protection, you just have to try each one to eventually get a working Android.
Option 1 bypass Google account after reset
- Insert the SIM card into the device on which you want to delete your Google account
- Call this Android device
- Accept the call and click the add new call button
- Write any numbers into the dialers and “Add a number to an existing account”
- Enter your Google account information
- Save contact to your account
- Restart Android
Option 2 bypass Google account after reset
- Insert SIM card into locked Android
- Call this device
- Accept a call and create/add a new call
- In the dialers we dial the following engineering code *#*#4636#*#*
- After typing, your Android should automatically redirect you to the advanced settings menu
- Press the back button and find yourself in the settings menu
- Go to the section " Recovery and reset" or " Archive and Restore«
- Disable “Data Backup” and everything related to data recovery
- We reset the settings
- When setting up the device for the first time, enter your account
Option 3 bypass Google account after reset
If your Android device supports Fastboot, then you can try performing an FRP reset through it.
To do this you will need:
- Computer
- Installed
- to device
- Transfer device to
Then you can enter the following commands:
fastboot oem clean_frp
or run this command
fastboot erase persistent
fastboot erase frp
fastboot erase config
Option 4 bypass Google account after reset
After the reset, you need to try to enter the settings menu, after which you will need:
- Computer
- Installed
- to device
- Connect Android to computer and run ADB RUN
Then enter the following commands:
adb shell content insert --uri content://settings/secure --bind name:s:user_setup_complete --bind value:s:1
adb shell am start -n com.google.android.gsf.login/
adb shell am start -n com.google.android.gsf.login.LoginActivity
For this method, you will need official firmware for installation using a computer. This firmware must contain a scatter.txt file.

Option 7 bypass Google account after reset
- Install the SIM card, turn on Android and get to entering your Google account
- From another phone we call the installed Sim in a locked Android, accept the call, hold the center key until Google Now appears, end the call from another device
- Click on the button Back, enter the word “settings” in the search bar and go to them
- Next, move to the “restore and reset” section and disable all the checkboxes and reset Android settings
Option 8 bypass Google account after reset

Option 9 bypass Google account after reset
For this method you need to have:
- Ability to install an SD card
- Download and transfer the file to the memory card
Then put Android into Recovery mode and flash the FRP-False.zip file.
Option 10 bypass Google account after reset
- Connecting to Wi-FI
- When the network check starts, go back
- We choose another Wi-FI network, no matter which one
- In the password entry field, type absolutely any characters, then select them, and click on the three dots (additional menu) and “Show hints”
- In Google we write “SETTINGS” and open the phone settings
- Next, select “Restore and reset” -> “Reset DRM licenses”
- We return to the Wi-Fi connection, connect and enter a new account
Option 11 reset FRP. For Xiaomi
- Choosing a language
- Select region (country of residence)
- Connect via Wi-Fi to the Internet
- Go back to the beginning using the back key
- Hold on the welcome page with 2 fingers until turned on. TalkBack
- Draw the letter L on the screen
- Select TalkBack settings
- Hold down the volume keys at the same time and turn off TalkBack
- Scroll to the bottom and select “Help Review”
- Start the video and go to YouTube (click the three dots when going)
- We find a video where there is a link in the description (almost all Android videos +1)
- Click on the link and then three dots, launch Chrome
- Login to Chrome, skip logging in
- We type in the search “ quickshortcutmaker «
- Download the found application
- Start installing the app > Allow apps to be installed
- Download the app again and install it
- Launch the application
- Turn on voice search and find Settings
- Select view
- Go to the settings menu "About phone"
- Press quickly seven times on the item “Miui Version” 7 times
- Go back
- Go to "Advanced Settings" > "For Developer"
- Select "factory unlock"
- Go back
- menu "Backup and reset" and perform a reset
Do you still have additional questions? Write them in the comments about what you did or vice versa!
Or otherwise experiment with the Android system, then custom TWRP recovery is what you need. If you are wondering how to install TWRP recovery on Android, then this article is definitely for you.
Your phone's "recovery environment" is a piece of software that you rarely see. It is used to install Android updates, restore to factory settings, and also perform other tasks. Google's default recovery environment is very simple, but third-party developers offer their own solutions, for example, Team Win Recovery Project (or TWRP) - allows you to make backups, install custom firmware, gain superuser rights, and much more useful. So if you want to change your smartphone, then you will need TWRP. You can also read what custom recovery is on Android and why it is needed. Today we will tell you how to install TWRP recovery on Android.
Step 1: Unlock your device and make sure it's compatible
You must be sure that your bootloader is unlocked. So, if you have not done this yet, we recommend reading the article on how to unlock the bootloader on an Android smartphone. When you're done, let's go back to installing TWRP. If your phone's bootloader is not unlockable, then you will have to install TWRP in another way.
Also, make sure that TWRP is available for your device and check out the TWRP and XDA Developers website to make sure you don't encounter any problems along the way. For example, Nexus 5X phones are encrypted by default, but when TWRP first came out for the Nexus 5X, it did not support encrypted smartphones. Therefore, Nexus 5X owners had to either decrypt their smartphone themselves in order to install TWRP or wait for an update, after which TWRP began to support encrypted smartphones. Make sure you know all the quirks of your device before proceeding.
Also back up anything you want to keep. This process will not delete your data from your smartphone, but creating a backup before changing the system is a good habit.
Step 1: Enable USB Debugging
Next, you will need to enable several options on your phone. Go to your phone settings and select "About phone". Scroll down to Build Number and click on this item 7 times. A message should appear indicating that you are logged into developer mode.
Return to the main settings page, you should see a new “For Developers” item. Enable “OEM Unlocking” if this option exists (if it doesn't, don't worry - only some phones have this option).
Then enable “USB Debugging”. Enter a password or PIN if required.
Once you do this, connect your phone to your computer. You will see a window on your phone asking “Do you want to enable USB debugging?” Check the “Always allow this computer” checkbox and click OK.
Step 2: Download TWRP for your smartphone
You need to go to the TeamWin website in the devices section. Find your device model and click on it to download TWRP.

This page usually contains Important information about the device that you should know. If you don't understand something, you can find more information on the XDA Developers forum.
Go to the “Download Links” section and download the TWRP image. Copy it to the folder where ADB is installed and rename the file to twrp.img. This is necessary so that the installation command can be written more quickly.
Step 3: Enter Bootloader Mode
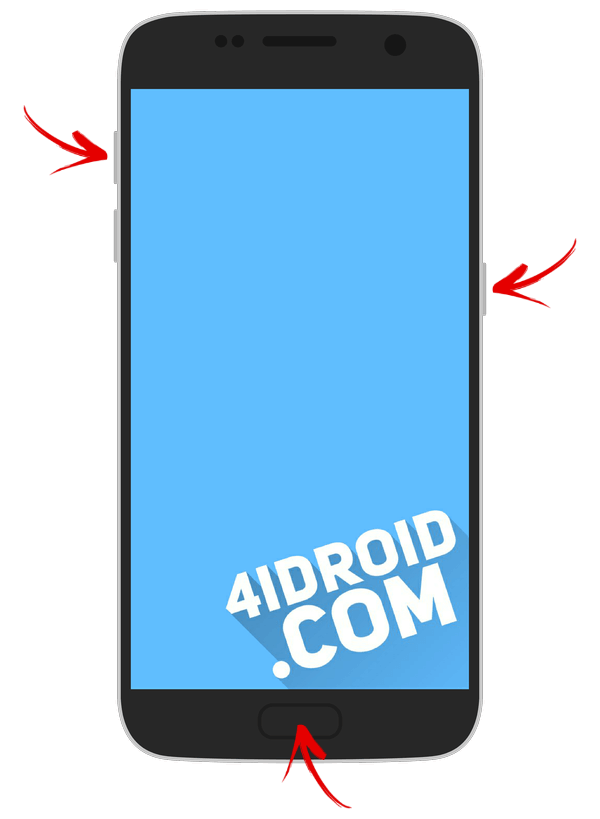
To install TWRP recovery on Android you need to enter bootloader mode. This is done differently on all phones; perhaps a search on Google or Yandex will help you to find out how this is done on your device. On many devices, this method helps: turn off the phone, hold down the power button and volume down key for 10 seconds, then release them.
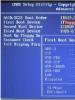
You have entered bootloader mode if you see an image similar to the following:
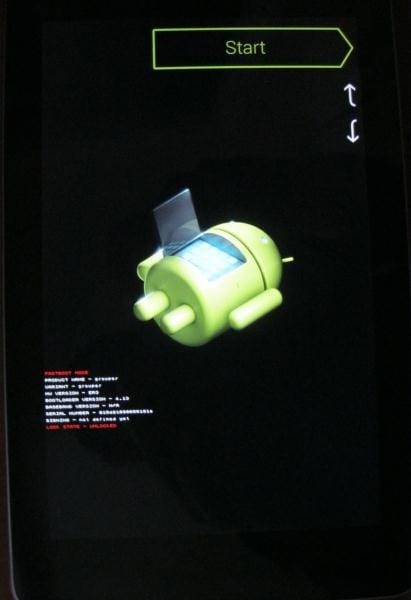
Your phone's bootloader may look slightly different (in HTC on a white background, for example), but, as a rule, it contains approximately the same text.
Step 4: How to install TWRP Recovery on Android
Once you enter bootloader mode, connect your phone to your computer using a USB cable. Your phone should show that the device is connected. On your computer, open the folder where you installed ADB and press Shift+right mouse button on an empty space and select “Open Command Window”. Then run the following command:
fastboot devices
The command should return your device's serial number, indicating that it is recognized. If the serial number is not found, then return to the first step and make sure that you did everything correctly.
If your device has been recognized, then it's time to install TWRP. Run the following command:
fastboot flash recovery twrp.img
If everything goes well, you will see a success message on the command line:

Step 5: Boot into TWRP Recovery Mode
Disconnect the phone from the computer and use the volume down key to navigate to the “Recovery” item. Press the Volume Up button or the Power button (depending on your phone) to select it. Your phone will boot into TWRP.
If TWRP asks for a password, then enter the password or PIN code that you use to unlock your phone. This is necessary to access memory.
TWRP may also ask if you want to use it in Read Only mode. This mode means that all changes will be deleted after a reboot. If you are not sure, then click on “Keep Read Only”. You can always repeat step 3 and 4 of this guide to reinstall TWRP when needed.
When you're done, you'll see the TWRP main screen. You can use it to create a Nandroid backup, restore a previous backup, install custom ROM and much more.
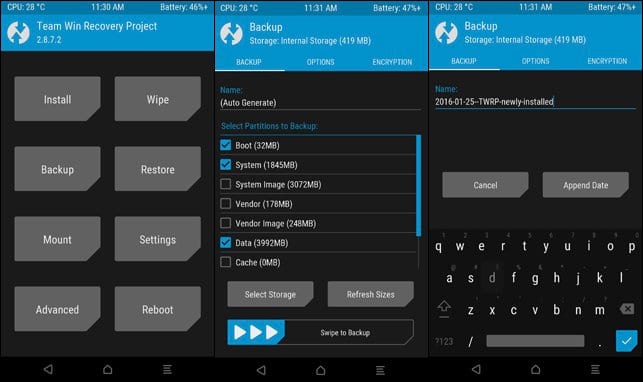
The most important thing now is to back up your phone before making any changes.
Click on the "Backup" button in the TWRP main menu. Select "Boot", "System", "Data" and swipe the slider at the bottom of the screen. You can also change the name of the backup by clicking on it.
Please wait while the backup is created. When the process is finished, return to the backup menu. Uncheck all options and scroll down. If you have a special partition after "Recovery", such as WiMAX, PDS, or EFS, then check them and make another backup. This section usually contains your EFS or IMEI information, which is very important. If this information ever becomes damaged, your data transfer will not work, and with a backup copy you can restore everything.
Lastly, if TWRP asks if you want to gain root privileges and install SuperSU, click “Do Not Install”. It is better to install the latest version of this application yourself than the one offered by TWRP.
Once you've made a backup, you can start exploring TWRP, gaining root privileges, installing custom ROMs, or booting into Android OS. Remember: Make a backup before making any changes to TWRP, it will help you restore your phone if something goes wrong.
Some users are absent-minded. They periodically forget their passwords and logins. This situation often arises when buying used phones. When you try to connect, you need to enter a new Google account. As a result, many people ask the following question: “I can’t log into my Google account! What should I do?”
The concept of a Google account
A “Google” account is an account of a specific user on Google. It is created during registration on the relevant website. With it, the user gets the opportunity to use mail, disk, the Google+ social network, YouTube video hosting, as well as other Google services. In addition, this account is required for users of tablets with Android OS installed.
This system is created by the above-mentioned corporation, therefore, to prevent theft, or taking into account the constant use of the gadget, the manufacturer links them to a specific Google account. It is the latter circumstance that most often causes people to be unable to log into their Google account.
The main reasons for the inability to log into your account
The first reason is user forgetfulness. There are those who create an account, do not use it for a long time, and therefore conveniently forget the password. However, it is quite easy to restore. To do this, when registering, you need to indicate an e-mail or mobile number, where a message will be sent if you click on the “Forgot your password” link.
The same problem applies to people forgetting their login. Recovery occurs in a similar way. When registering, indicate your real full name, because when you restore your login, you will be asked for them, and if you entered fictitious data, you are unlikely to remember them. If you remember, you will receive a confirmation code (by email or phone), after which you will be able to log in to your account.
If you receive a message that such a user is not registered in Google, then check all the data, including the backup e-mail, remember whether your phone number has changed, and if so, whether it is currently available.
Sometimes, when logging into your account through your browser, you may receive a message that Cookies are disabled. You need to enable them. The order in which they are enabled is different for each browser. If this does not help, you need to clear your browser cache.
By following these simple instructions, you can save yourself from the question of what to do if you can’t log into your Google account.
If your account is blocked, it will take longer to restore it.
Login to your account from a mobile phone
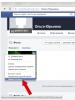
In order to log into your Google account from a mobile phone with a pre-installed Android operating system, you need to go to the phone’s settings, open “Accounts”, and then click on “Add account”. Some models offer to add accounts not only Google, but also others. Click on Google, after which a menu appears in which you enter your username and password. Here you can create a new or primary account if one has not yet been created.

If you enter the registration data correctly, you will log into your account, and this data will be used by your gadget.
This way, the answer to the question on the phone?" will be quickly found.
Login to your account after using the reset function
After the release of Android 5.1, gadgets based on it received a function that should help protect them from use in the event of theft or loss. The meaning of this function comes down to the fact that the gadget asks you to log into your Google account after using the reset function. If you remember all the details of your account, this is your phone, and not bought second-hand, then solving the problem is not difficult. Just enter your details and that's it.

Different gadget models have their own ways to bypass Google's protection. It is impossible to consider them all within the framework of one article. We will give some universal methods, but there is no guarantee that they will work on a specific model.
- We insert our SIM card into the locked gadget, call it, accept the call, click on “Add new call”. When dialing numbers, randomly click on the numbers, click on “Add a number to an existing account”, after which you should be prompted to add a “Google” account, enter this data, reboot, having previously saved the randomly dialed number in your account.
- Until the first click (the first 3 steps), we repeat the steps of the first method. When dialing numbers, press *#*#4636#*#*, as a result you should get to the extended settings menu, click “Back”, go to the settings menu, select “Backup and Restore” or “Restore and Reset”, disable the recovery functions , including data backup, restore factory settings (reset), after loading, enter your Google account.
Thus, if you cannot log into your Google account after resetting the settings, you need to try these two methods. If this does not help, try searching for instructions for your gadget yourself on the Internet. It may require the installation of third-party programs and Fastboot support.

Finally
Finding a solution to the problem “I can’t log into my Google account” is actually easy. In the article we described several effective methods. First try to remember your login and password, contact Google for help. If you can't unlock your phone after applying a factory reset, try various methods to regain access.
If you have forgotten your set password or pattern on Android, there is no reason to panic. Access to your smartphone can be restored, and there are several ways to remove the lock. The updated instructions describe each of them in detail.
How to reset a password or lock on Android
(!) The article contains the main methods of resetting a password/pattern, ranging from the simplest (when you remember the username and password of your Google account) to the more complex: Hard Reset, deleting the “gesture.key” and “password.key” files. Read all the points carefully, follow the links provided for detailed instructions, and everything will work out!
Method 1: Enter your Google account information
Working method for devices running Android 4.4 and below. Starting with Android 5.0, this option was removed from many firmwares. But not all manufacturers did this, so check whether it works for you or not.
When your phone or tablet is connected to a mobile network or Wi-Fi, to remove the lock, you just need to enter your email and password. To do this, enter the pattern key incorrectly 5-10 times, after which a warning will pop up about blocking the device for 30 seconds.
The “Forgot your pattern key?” button will appear on the screen; by clicking on it, you can enter your data and unlock the device.

If you forgot your account password, you will have to recover it - go to this page from a working gadget or PC.
Please note that this method requires Internet access. Therefore, open the quick settings panel by swiping down (“the curtain can be opened directly from the lock screen on Android 5.0 Lollipop and newer) and turn on mobile data or Wi-Fi. The device will connect to the access point if it has previously worked on this network.

2. Reset picture password using ADB
The pattern can be removed using ADB. You need to connect the device via USB to your computer and enter the necessary commands. All details in

The method will only work when USB debugging is enabled.
Method 3. Reset to factory settings
The next method is simpler than the previous one, but using it will delete all data from the internal memory, such as installed applications, linked accounts, SMS, etc. Photos, audio and other files on SD will remain intact. You will find complete instructions in the article:.

The next time you activate the device, restore the data from the backup copy - it works provided that it was carried out previously.
Method 4. Flash a smartphone or tablet
By flashing your Android phone or tablet, you will remove the lock or password. On our website there is firmware for Android devices from various manufacturers, separately Samsung through and LG through.
Method 5: Removing gesture.key (pattern unlock) and password.key (password reset)
The method is intended for owners of phones and tablets with and. Its effect is that the system files “gesture.key” and “password.key”, which are responsible for displaying the graphic lock and password, respectively, are deleted.
For this you need the Aroma file manager. Download the archive from the link and send it to your phone or tablet without unpacking it. Then turn off the device and . To do this, instead of the power button, press and hold one of the possible combinations (or read the FAQ for specific models):
- Volume up + “ON”
- Volume down + “ON”
- Volume up/down + Power + Home
Using the volume up and down buttons, you can move up and down, respectively, and confirm your selection with the power/lock button. In new smartphones, Recovery can be touch-sensitive.
Instructions:
1. In the CWM Recovery menu, select “Install zip”.

2. Then click “Choose zip from /sdcard” and go to the folder where Aroma was downloaded or use “Choose zip from last install folder”. In the second case, you will see all the latest downloaded archives, among which you will find the one you need.

3. Select the archive with Aroma Explorer.

- “gesture.key” (“gatekeeper.pattern.key” in new firmware)
- "password.key" (or "gatekeeper.password.key" instead)
- "locksettings.db-wal"
- "locksettings.db-shm"
Select them and click “Delete” in the additional menu.

Finally, reboot your device. You can enter any password and the phone will be unlocked. Then feel free to go to the settings and set a new lock.
6. How to remove graphic lock via TWRP Recovery


Unpack the archive with Odin and run the program.

Switch your smartphone to firmware mode (aka Bootloader, download mode). To do this, with the device turned off, press and hold 3 keys:
- “ON” + volume down + “Home” button

When you get to such a menu, press the Volume Up key to continue.

Android and the word “Downloading” will appear on the screen - which means you have switched Samsung to firmware mode.

Connect your phone to your computer via USB and wait for the drivers to install. The first cell “ID:COM” will display the connected port, and the message “Added” will appear in the logs.

Now click on the "AP" button ("PDA" in older versions of Odin) and select the Recovery file.


If there is a checkmark next to “AP”, and the path to the file is written in the field next to it, you can proceed.
To start the firmware, click “Start”.

Since the weight of the Recovery file is small, the process will take a couple of seconds. The message “All threads completed. (succeed 1 / failed 0)”, and in the upper left cell – “PASS!”. This means that the custom Recovery firmware was successfully installed.

Now turn off your phone and hold one of the key combinations to get into Recovery:
- “Home” + volume up + power on
- “Home” + “ON” (on older Samsung)
- Volume up + power on (on older tablets)
Depending on the installed Recovery: CWM or TWRP, go to steps 5 or 6 of this article and delete the files:
- "password.key" ("gatekeeper.password.key")
- "gesture.key" ("gatekeeper.pattern.key")
- "locksettings.db-wal"
- "locksettings.db-shm"
13. How to remove the unlock key on Huawei and Honor: backup PIN code
On Huawei and Honor, in addition to the pattern key, a backup PIN code is used. Therefore, to unlock the device, you need to draw the pattern incorrectly 5 times, and the display will display the message: “Try again in 1 minute.” Wait 60 seconds for the “Backup PIN” button in the lower right corner to become active. Click on it, enter your PIN and the unlock key will be instantly reset.
14. Backup PIN on LG
When setting a screen lock on LG, you need to set a backup PIN code, which you can enter instead of a pattern or password, and unlock the phone.


To do this, draw an irregular graphic pattern until a message appears indicating that input is blocked for 30 seconds. Click “OK”, select “Forgot your pattern?” at the bottom, enter your PIN code and click “OK”.

15. Smart Lock function
Starting with Android 5.0, the system has a Smart Lock feature that allows you to disable the screen lock in certain situations. For example, when the device is at home or connected to a trusted device via Bluetooth. Depending on the device manufacturer, as well as the version of Android, there are different unlocking options using Smart Lock, such as voice detection, face recognition and others.
The range of functions of modern smartphones and, at the same time, the integration of mobile devices into our daily lives is growing rapidly. This means that the issue of security should be considered by each user even more carefully. In this article, we will consider one of the ways to protect a smartphone based on Android OS from unauthorized access - let’s talk about how to set a password for the recovery menu.
What is recovery? TWRP Features
To begin with, of course, let’s highlight what recovery on Android is for those who may not know this yet:
Recovery is a system recovery menu for smartphones based on the Android OS operating system
That is, using the recovery menu, you can manipulate the device system aimed at restoring the device’s functionality. The most common options for custom (modified, not standard) Recovery Mode today, perhaps, are CWM(ClockworkMod) and TWRP(Team Win Recovery Project).
TWRP(Team Win Recovery Project) is a modified version of the Recovery mode from TeamWin, which has expanded functionality compared to the standard Android recovery menu
TWRP's feature set is truly enormous:
- touch screen support;
- deep customization of menu settings;
- full administrative functionality: backup/restore, installation of zip packages, wipe menu;
- presence of a built-in file manager;
- and many other possibilities.
But there is one feature that the TWRP developers did not bother to add. It's about giving the user the opportunity set a password for recovery and by this, block TWRP from unwanted access.
Why block TWRP
Let's look at the demand for the publication topic: Why put a password on recovery? To do this, we will touch on only two ways to use Team Win Recovery Project:
- Many people encountered TWRP for the first time not for the purpose of creating a complete backup of the system, the so-called Nandroid Backup, but for the purpose of custom ROM firmware to your smartphone.
- Users who are interested in the Android system, as well as those who have at least once forgotten the password or pattern to unlock a smartphone, know that in order To reset your password or pattern lock, you can do a full wipe in recovery.
Both examples show how powerful recovery mode can be in the right hands. But how can you protect yourself from unauthorized access to such a tool by third parties? A fairly simple and convenient way - set a password to enter recovery.

The method described in this article does not provide 100% protection against interference in the system through the recovery menu, since setting a password to enter TWRP does not prevent the Recovery itself from being re-flashed with the loss of the settings made.
Setting a password on TWRP
So, let's move on to the procedure for setting a password to enter the recovery menu.
All actions that you perform with your smartphone are performed by you only at your personal responsibility and at your own risk. Neither the author of the article, nor the site administration, nor the creators of the files below don't carry no liability for possible malfunctions in the operation of devices and systems that occur as a result of the manipulations performed
1. First we need to download theme update file for TWRP already installed on the smartphone:
2. The downloaded file must be placed in the following directory without renaming ( it is important!):
/sdcard/TWRP/theme/
Place file ui.zip you can use the file manager of your smartphone or in the computer explorer to the desired folder, after connecting the device to the PC via USB. Please note that the file must be placed on the main partition of the phone's memory; more information about Android system memory is written in the article

3. After copying the file, turn off the smartphone and turn it on by entering Recovery Mode.
If everything went well, we will immediately be greeted with a password entry window. Default password - David98, as evidenced by the corresponding inscription at the top of the screen: Default Password is David98
. Out of respect for the author of the update file, user nicknamed davidkocka98, the standard password has not been changed. Enter the password and get into the usual TWRP menu.
Change TWRP password
To change the recovery password in TWRP, click on the Settings section and go to the Change Password item that appears

In the expanded input field, first enter the old password (in our example - standard David98), press the button Change Password, then enter the new password that we want to set and fix the changes with the same button Change Password.

The password to enter recovery has been changed.
Removing TWRP Password
If you want to rollback previously made changes and remove the password prompt when logging into TWRP, then it will be enough to delete the file ui.zip from the catalog
/sdcard/TWRP/theme/
You can delete this file either from the file manager of your smartphone or computer explorer, or directly from the TWRP menu.
To delete a file from TWRP, follow the Advanced path, then File Manager, open the theme directory, " tap" to file ui.zip and select the item Delete.

After restarting Recovery mode, you will not be prompted for a password to enter recovery.
It is worth noting that this method was tested only on TWRP below version 3, on new versions in its current form, the file will most likely be inoperable.