Power unit. How to connect a television antenna amplifier. Antennas for a TV in the country How to connect a common antenna to a TV
The TV itself cannot receive signals. To do this, an antenna is installed in front of it, which is connected via a cable. Its service life under normal operating conditions is about 10 years. When it is outdoors and exposed to the elements, replacement will be required much sooner. The cable fails especially quickly when suspended.
The photo below shows a modern television cable.
Installation of a modern television cable
It is prohibited to use a suspended cable without a support cable.
For difficult climatic conditions, a special cable is used, which should be indicated in the characteristics.
Cable device
In the center of the core there is a central copper conductor with a diameter of 0.3 to 1.1 mm (signal wire). It is not recommended to take a smaller size, since it is designed for the frequency of the meter range. Through a thin cable, the TV will only show the main channels. It is better for the user to choose a thicker cable that has less signal loss.
On top there is a shielding layer of aluminum foil and a braid of thin copper wire, which protects against external interference in the form of electromagnetic waves. Between the central wire and the screen there is a layer of polyurethane insulation. Outside there is another insulation made of polyvinyl chloride or polyethylene to protect the cable from mechanical stress and ultraviolet radiation.
The cable must have foil and braid as a screen. Old-style products with a single braid are not suitable for modern video signal transmission standards.
The centers of the wire and the screen coincide in the radial direction. Due to this, losses of the transmitted signal are reduced.
Coaxial cables differ in the following parameters:
- outer diameter (best sizes - 6-8 mm);
- wave resistance;
- degree of shielding;
- flexibility.
The markings of common television cables are as follows:
- imported – RG-6, RG-59;
- domestic - RK-75 (75 Ohm - the value of wave impedance).
It is not recommended to purchase the RK-75 cable, as it has a high signal attenuation rate. In city conditions, this may not be noticed due to the close proximity of transmitting stations, but in rural areas, signal loss becomes noticeable.
When laying a television cable near electrical wiring, its diameter must be at least 10 mm and have increased protection against interference.
When choosing a cable, you should pay attention that it is not too flexible. The braid should be chosen more densely. Too rare - it easily misses interference. The foil should not be very thin.
The insulation of the central core should be hard, not soft like foam rubber.
When studying the passport data, attention should be paid to the frequency and amount of attenuation of the television signal at a certain length. The lower they are, the higher the quality of the cable.
How to extend a TV cable
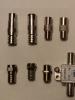
When lengthening the cable, you must remember that this leads to a decrease in the quality of the transmitted signal. It is recommended to create no more than 1-2 connections. The photo shows different types of cable connection and branching devices.

TV cable connectors and splitters
- The insulation layer is removed from both ends and the copper braid and aluminum foil of the screen are wrapped in the opposite direction. The inner side of the foil is covered with a thin layer of polyethylene or lavsan. To ensure reliable electrical contact, half of the foil should be folded back so that the conductive side is on the outside for better contact.
- The internal insulation is peeled off down to the signal wire in a section 1 cm long. In this case, it is necessary to prevent the formation of undercuts in the copper conductor, which reduces its strength.
- After preparing the ends, F-plugs are screwed onto the cable through foil (Fig. a). The central core should protrude 5 mm from the plug. If it turns out to be longer, it should be trimmed.
- Screwing the ends with F-plugs onto the F-socket adapter (Fig. c).

Splicing a television cable: a – F-plug; b – F-socket adapter; c – detachable connection
Connection of plug and socket
The same nuts are screwed onto the ends of the cables as in the previous method, but the TV plug is screwed onto one of them, and the TV socket onto the other. Then they are connected. To make it reliable, it should be wrapped with electrical tape. The photo shows connections wrapped with electrical tape. They don't look very attractive, but they are reliable. Usually they are hidden in cable ducts.

Wrapping cable connections with electrical tape
Plugs are available in straight and angled versions. They are mounted on the cable in the same way. Angled - used for ease of connection, where a straight plug is not always convenient to use, as well as when creating complex turns.

Angled plug is used where using a straight plug is difficult
Twist
This method is the worst because the connection is not protected from electrical interference. It is better to solder it with tin and place it away from the electrical wiring. If wiring to several TVs is done in this way, the connections are made in the junction box. In this case, the screen and central wires are carefully insulated from each other.
Wiring via splitter
A splitter is a metal box with one “IN” input and two or more “OUT” outputs.
An external cable is suitable for the input, which should not have any splices. The splitter is attached to the wall or floor so that there is no danger of tearing out the cabling. The connector comes with butt nuts. They should be screwed onto the pre-prepared ends of the cables and then connected to the plugs. Next, the input is finally connected to an external cable, and the outputs are connected to television receivers.

TV cable splitter
If the number of TVs in the house exceeds two, instead of the usual one, install an active splitter containing a video signal amplifier. It is placed as close to the receiver as possible. This splitter is connected to the mains power supply.
With any method of connecting cables, easy access must be provided in case of repair.
Cable laying rules
- Away from electrical wiring and powerful electrical appliances.
- Minimum number of connections.
- Use only factory splitters and connectors.
- Intersection with power contours is allowed only at right angles.
- It is not allowed to twist the cable into turns or bend it at an acute angle.
- In the panel box, the connection is created only by soldering and with minimal exposure of the cable.
Cable preparation. Video
The video below will tell you how to prepare a TV or satellite antenna cable for use.
You can extend and branch a television cable with your own hands if you follow the rules described in the article.
Hello dear readers of the blog site. Recently I have written several articles regarding the installation of digital television in the country. Today I want to talk about how to lengthen the antenna cable if you need to move it for better reception, or if the TV installation location is not suitable for comfortable viewing of TV shows.
In the article about I have already touched on the topic of the need to purchase a high-quality coaxial cable in order to avoid possible problems with signal reception. But I will tell you below what to do and what tools you need to purchase and really hope that everything will be as accessible and clear as possible.
Proper work done will not affect the quality of the received signal. If malfunctions occur or the quality has deteriorated after work, then it is worth checking all the connections and assessing how high-quality the materials were purchased.
Necessary tools and materials for antenna cable extension
If you need to move the TV to another room, or to a corner of the room, there is a shortage of wire length and the question arises of purchasing an additional piece. Before going to the store, be sure to inspect the existing one, evaluate the thickness of the central core, rewrite the markings, and it is best to cut off a small piece for a visual example when purchasing.
In my opinion, there are only two optimal ways to extend a television cable. The first using “F” connectors, and the second using a “splitter” for possible further wiring to several devices.

I won’t talk about soldering, since this matter is quite complicated. When extending a television cable by soldering, it is difficult to achieve the proper wave impedance. And the junction itself will be very fragile.
So, let's look at both options in order.
How to extend a TV cable using “F” connectors
For this method we will need two f connectors and one f connection. Before proceeding with the extension, the wire must be properly “cut”. To do this, carefully remove the top shell without damaging the screen. We twist the shielded braid and bend it in the direction of the cable. We remove the foam insulation, thereby exposing the central core. The approximate length of the freed core should be about one and a half centimeters.
This operation must be performed on both ends that you want to fuse. After the completed operations, take the f connectors and carefully screw them onto the wire. Keep track of so that the central wire does not contact the outer shield.
For better fixation, the junction can be wrapped with electrical tape. This fixation will prevent your product from falling apart when bent or deformed.
This was the first way to extend a coaxial cable. Now I propose to consider the second option and, in my opinion, more practical.
How to extend a coaxial cable using a splitter
Let's first understand what a splitter is and what it is needed for.
A splitter is a small box with one input and several outputs. A splitter is designed to split a connected antenna into several TVs, or to one cable. When choosing a suitable device, you should immediately decide on the number of connected TVs. This is necessary for the correct choice of divisor.
To begin with, such a device should be firmly fixed on a flat vertical or horizontal surface. Only after this proceed with the actual installation. In fact, this method of extending an antenna cable is similar to the previous one. As in the first case, it is necessary to use two f connectors screwed onto the ends. After which we connect the wire coming from the antenna to the input of the splitter, and connect the piece with which we are going to extend the line to the output. In fact, this is the same f connector only with the possibility of further branching.
 That's all the information on how to extend the antenna cable. If, in your opinion, the article seemed incomplete and you are looking for other options for solving the problem, then I can easily supplement it, but in my opinion these are the main and simplest ways to solve the problem. In addition to all that has been said, I suggest, for general self-development, to read an article about this, since this question arises quite often when rearranging furniture in an apartment or moving. For clarity and reinforcement of the material, I suggest watching the corresponding video.
In order for the TV to show, you need to connect an antenna to it. For this purpose, the TV has a connector for connection, the so-called antenna socket. The other part of the connection, the plug, is mounted on the antenna cable, which actually connects either to the antenna, even a satellite one, or to the distribution box of the cable television network, if the owner is connected to it.
In contact with
TV plug
Previously, in order to connect a plug to a cable, it had to be soldered. Then they began to use antenna connectors, which are mounted by soldering bases. In the first models of this part, the central antenna wire core screwed to the contact with a screw. And finally, they now use international standard type F plugs. Strictly speaking, this connector is simply a bushing that consists of two parts and is screwed onto the antenna wire.
In order for the TV to have a high-quality picture and the signal not to be lost, it is necessary to ensure that there is good contact at the connection point. If this seemingly simple task is not solved correctly, the TV will operate with noise in both image and sound.
 To properly connect the antenna wire to the TV, it is not at all necessary to call a specialist. All manipulations It is possible to make it yourself using simple tools that everyone has.
To solve this problem you will need:
- antenna cable (otherwise known as coaxial cable).
- F type plug.
- knife or stationery cutter.
Antenna plug prices
antenna plug
What is a cable?
The antenna cable is a multilayer wire that, due to its shielding properties, can transmit a stable signal. Consists of a central core, copper wire, dense plastic insulation, aluminum foil (the second conductive element), shielding braiding, which dampens interference and final external insulation, and protects from weather and mechanical influences.
The market now offers a wide variety of these products, both domestically produced and imported.

Antenna cable prices
antenna cable
How to prepare the cable
Having everything you need, you can start connecting the antenna to the TV. Connect the plug to antenna cable satellite or other antenna, possibly in two ways: by wrapping the shielding braid and without wrapping it. It would be better and more reliable for contact to wrap the shielding braid, but if this fails, you can not wrap it.
In order to cut the cable, take a knife or cutter and, stepping back 1–1.5 centimeters from the end of the cable, carefully cut the outer insulation in a circle.
 The main thing is not to damage the braid and aluminum foil. Remove the cut insulation. Now the exposed part of the braid and foil must be wrapped back onto the wire itself. There is one nuance here. To make the foil stronger, it is covered with polyethylene on the inside. It is impossible to clean the plastic layer without damaging the foil. If you simply push the plug onto the unscrewed part of the foil, the contact will be unimportant or, in general, bad.
In order to avoid this, you need to bend half of the foil back and the conductive part will be on top. Then we remove the central core from the insulation, retreating 0.5–1 centimeter, again trying not to damage the wire itself. Now we wrap the first half of the plug onto the foil. We make sure that the central wire gets into the core of the plug. After, “bites off” with pliers part of the central core, so that it protrudes from the union nut by 4–6 millimeters. Finally, screw the second part of the plug until it stops. And our antenna plug is ready for use. Can be used for both satellite dishes and analog TV.
If the foil is not wrapped, then the top insulation is simply cut off, the braid is removed and the plug is screwed onto the open section of the cable.
If you happen to have a plug of a previous modification in your hands, which also did not require soldering. It must be connected to the TV cable as follows. Disassemble the plug by disconnecting the plastic half. Place this plastic part on the wire first.
How to connect a TV to an antenna cable
 To connect your TV to cable TV, you need a cable. At its end you need to install an F plug, specially designed for a television antenna. If the user not very good at understanding In this matter, it is better to seek help from specialists. Because if this work is done incorrectly, then both analog and digital signals will not work correctly, which will result in a loss of image quality on the TV.
The choice of cable is of great importance. Even a TV of the latest brand and correctly placed F plugs on the ends of the cable cannot give an excellent picture if a low-quality cable is used. What is the best cable, and how can you recognize it among the many offered on the market?
To do this, you need to have an idea of how high-frequency TV signal current flows through the cable. And the higher this current indicator, the closer it goes to the surface conductor. Due to the low height of the television signal in the antenna cable and its high frequency, it is impossible to determine without special instruments. You can determine whether there is a signal or not by connecting the antenna to the TV.
The most purchased and widely known on the market are cables with a characteristic impedance of 75 Ohms, which are excellently used for receiving and transmitting television signals. Marking is done depending on increasing quality. It is usually applied to the top layer of the antenna cable along its entire length, every linear meter next to the digital meter mark.
If the consumer has the skills to work with wires and certain knowledge, then he can easily connect the TV to the antenna on his own. The main thing is to follow the instructions and not deviate from the rules.
It is important to remember that the voltage of the television signal in the antenna wire is millionths of a volt. Therefore, such a cable does not pose a danger to human life.
It happens that after the antenna plug is inserted into the TV socket, it becomes impossible to move it closer to the wall, because the cable is in the way. In order to get rid of this problem, you should use a special F-socket, that is, a plug of an angular design.
These two plugs are essentially the same thing, and they are installed in the same way. The only difference between them is in form.
But before their appearance, other plugs were used, the connection technology of which was completely different.
Is it possible to do without a plug?
There are times when you urgently need to connect a cable to your TV, but you don’t have a soldering iron. It turns out that you can do without his help. This will require just remove the top layer shell and remove the braid. Then remove the insulating layer from the central wire of the cable. The wire itself must be folded into a loop, the width of which is slightly larger than the hole in the TV connector socket.
Which antenna plug is preferable?
Definitely the best plug for a television cable is the F plug. His the advantages are implementation of excellent quality television signal, as well as ease of installation. Which is undoubtedly more popular among home craftsmen.
The over-the-air antenna is connected to the TV using a special cable. Using this method, you can connect to antenna several television receivers. The cable connection should be carried out observing the rules for connecting electrical devices and applying the connection diagram given in the technical documentation for the TV.
You will need
- – antenna amplifier;
- – splitter;
- – antenna cable;
- – knife (scalpel);
- – wire cutters;
- – soldering iron.
Instructions
1. If the signal is unstable and unsatisfactorily strong, use an antenna amplifier when connecting the cable. To connect several television receivers, also prepare a splitter (scrub).
2. Amplifier, splitter and antenna cable install in close proximity to television wiring. In a private house, it is more comfortable to do this in the attic. If there is no television wiring, install cable at ease to the place where the TV will be installed.
3. Mounting cable, place it outside the wall or connect it to internal communications, and hide it inside the room under the baseboards.
4. Connect the end of the cable coming from the antenna to the corresponding terminal of the amplifier. From it, the signal is fed to a divider, which is easily connected to television receivers.
5. When using a satellite dish, use an intermediate device - a receiver. In this case, easily connect the cable to the receiver via the antenna socket.
6. Before connecting the cable to antenna prepare it for connection. Cut the top braid of the cable with a sharp knife or scalpel approximately 40 mm from the end. Bend back the screen located under the braid and expose a further insulating layer.
7. Remove the cut portion of the second insulating layer, leaving the copper core exposed. Strip the core with the tip of a knife and cut to the desired length (approximately 20 mm).
8. Screw the lower part of the dismountable plug onto the braid, threading the cable core inside the plug. Insert the bare wire into the second part of the plug and screw both parts together. Carefully remove any remaining antenna cable braid. The cable is ready for connection.
9. Before turning on the television receiver, carefully check that the switching devices are connected correctly and that the plugs are securely fastened in the sockets. If the screen displays a weak signal or interference in the form of ripples, adjust the antenna amplifier using the technical documentation supplied with it.
Satellite television is becoming more and more famous. Ordinary antennas cannot provide the desired image quality. But using a dish, anyone can watch TV channels in digital format. Purchasing the necessary equipment costs a considerable amount, so people sometimes look for a way to save money. For example, you can connect your TV to a satellite dish independently. All modern television broadcast satellites operate in the Ku-band (10.7-12.7 GHz).

Instructions
1. First, you need to choose the location where you want to install your satellite dish. It is important that the view from the installation point to the satellite be open. All satellites are located in a southern direction, from southwest to southeast. You can calculate the installation location of the dish using two formulas. Formula for calculating the elevation angle: F = arctg(/sqrt(1 – Cos2(g2 – g1) x Cos2(v)]) Formula for calculating the azimuth: f = 180° + arctg( tg(g2 – g1)/sin(v))g1 is the longitude of the satellite, g2 is the longitude of the receiving location, v is the latitude of the receiving location. The SATTV program will also help you in this matter.
2. Make sure there are no obstacles at all. Buildings, trees - all this will be a hindrance. However, the antenna should be located in a place that is easily accessible to you. Assembly instructions should be included with the antenna. If you follow it correctly, you will be able to independently cope with editing without any problems. The support must be secured very firmly. Be careful not to damage the parabolic mirror. Even small deviations lead to signal deterioration.
3. Now you can start connecting the equipment. At the same time, while you are near the equipment, you must also see the TV screen. You may need an assistant. The converter is connected to the receiver by cable. A dark screen will appear. Now you need to set the frequency for the receiver with OSD support.
4. Next you need to tighten the screws that control the movement of the antenna in the azimuth and elevation directions. But do this not all the way, but so that you can move the plate up and down and left and right, applying some effort. In this case, the antenna should be static if not touched.
5. After this, you can start scanning the sky. Making sure that the signal is as clean as possible and the picture is excellent, secure the plate completely. Your satellite dish is connected to your TV and is ready to delight you with high-quality television.
Helpful advice
Read the instructions for the equipment carefully. Each dish may have special installation requirements.
A 2nd or even 3rd TV at home is not a luxury, but an inseparable part of a comfortable life. But in order to enjoy it to the fullest, you need to correctly connect the antenna splitter .

You will need
- – antenna splitter;
- – television cable;
- – plugs;
- - knife.
Instructions
1. Select the location where you plan to install the antenna splitter. Mark the future locations of the splitter and your television receivers.
2. Take a tape measure and measure the distance to each of the TVs that you will connect. Write down the outcome. Add up the results of your measurements. You have received the total cable length. Add a couple of meters to this number for insurance.
3. Purchase the required number of cables, as well as everything you need: splitter, plugs (according to the number of TVs), mounting brackets (if you are going to attach the cable to the wall). When purchasing, check whether the inner diameter of the splitter nuts matches the outer diameter of the cable.
4. Cut the cable into pieces to suit your size. Using a sharp knife, remove the outer sheath from the end of the cable. Separate the foil screen and braid from the center and bend it onto the uncleaned part of the cable. Be careful not to accidentally cut them. Also remove the insulation from the central part of the cable.
5. Place the splitter nut on the end of the cable. Bend back the screen and braid. Insert the center core of the cable into the splitter socket and tighten the nut. Repeat these steps with the remaining sections of cable. Secure splitter at the selected location.
6. Connect the entire piece of cable to the TV for which it is intended. If necessary, secure it using purchased staples or place it in the cable channel of the baseboard.
7. Install the plug on the free end of the cable. To do this, prepare the cable as described above. Replace the plug cap. Bend back the screen and braid. Insert the central wire into the hole in the plug and secure with a screw. Crimp the braid around the cable sheath with a bandage. Screw the cap onto the body. Insert the plug into the antenna socket of the TV.
8. Turn on all television receivers to evaluate the quality of reception. If it does not meet your requirements, you need to install an antenna amplifier.
Video on the topic
Helpful advice
Instead of a knife, you can use a special cable cutter.
Receivers operating on ultrashort waves have long ago become commonplace. We use the radio at home, in the country and even in the car. But as you move away from the broadcasting station, the signal quality deteriorates noticeably. It is not always possible to install an effective receiving antenna; therefore, the solution to the problem may be the use of an antenna amplifier. If you know how to use a soldering iron and understand basic electronic circuits, then you will be able to make one like this amplifier with your own hands.

Instructions
1. Check out the circuit diagram of the antenna amplifier. It is made on a low-noise transistor, providing a gain of approximately 20 dB. At the input, low-pass filters with a cutoff frequency of 115... 120 MHz and a high-pass filter with a cutoff frequency of 60... 65 MHz are switched on in steps. This allows signals from broadcast stations operating in the VHF range to be amplified.
2. Make a list of the parts you need. In addition to the transistor, you will need several resistors and capacitors, as well as inductors. The parameters of the elements are shown in the figure for step 1.
3. Take the transistor type KT3120A or KT368A (the 2nd option is less preferable). It is advisable to use imported capacitors in the device, similar in parameters to domestic K10-17. Resistors of types MLT and C2-33 will be absolutely suitable for the amplifier. Wind the coils from PEV wire using a mandrel with a diameter of 4 mm. Coil L1 contains 3.5 turns, and L2 - 4.5 turns of wire.
4. If you plan to use amplifier in a car receiver, add two relays and an additional power filter to the circuit. When power is applied, both relays turn on amplifier between the antenna and the receiver. When the power is turned off, the receiver input is connected to the antenna. Be sure to equip the car version of the amplifier with a metal case.
5. Prepare a printed circuit board made of fiberglass, foil-coated on both sides, for mounting the device elements. The pattern of printed paths may vary (depending on the layout of parts you choose). Leave the second side of the board metallized and combine it with foil along the silhouette with the general conductor of the upper side. Make the board for the automotive version of the amplifier longer so that you can easily place a power filter and relay on it.
6. Assembled amplifier connect between the receiver input and the antenna socket, and probably make the connection with a short shielded cable. When installing the device in a vehicle, place it close to the receiver in a shielded housing.
7. Check how effectively the device amplifies the signal. If necessary, reduce the capacitance of the capacitors and increase the inductance of the coils (but not more than one and a half times). Consider that in a city where the signal level of radio stations is high, the antenna amplifier should be turned off to avoid signal distortion.
If your TV is located at a significant distance from the television antenna or satellite television cable, you will have to make a little effort to lengthen the cable. In this case, there is no need to move furniture together with equipment.

You will need
- – antenna cable;
- – F-connector;
- – I-connector;
- – antenna amplifier;
- – soldering iron;
- – solder;
- - electrical tape.
Instructions
1. Look at the antenna cable brought to your apartment. It could be cable with a single-core or stranded wire in the center.
2. Buy an additional television cable the required length, measuring it in advance and adding a couple of meters. Strictly the same type as the existing one. This can usually be done in any store that sells television and radio equipment, or at the radio market.
3. You will purchase two F- and one I-connector, i.e. two connectors are of the “father” type and one of the “mother” type. It is also possible to use one combined “father-mother” connector.
4. Prepare both cables. To do this, trim the edge of the cable evenly, carefully cutting off approximately 15-20 millimeters of the top layer of insulation. The main thing is not to damage the cable braid. Also carefully wrap the braid back, remove the foil that covers cable .
5. Expose the central wire by cutting off 10-15 millimeters of insulation from it. Be careful not to break or cut it with careless movements.
6. Enter cable into an F-connector of the “father” type. Screw it all the way. In this case, the core of the central cable should fit into the protruding central connector, and the wrapped braid will be clamped between the outer sheath of the cable and the connector body. A small fragment of the central core wire will protrude beyond the outer edge of the connector. Cut it with scissors or wire cutters, leaving approximately 2-3 millimeters.
7. Similarly connect the 2nd cable. Now connect two F-connectors of the “father” type with the support of an I-connector of the “mother” type.
8. Instead of the I-connector, you can use a special antenna amplifier. It has inputs for connecting F-connectors. Such an amplifier is needed if cable has a huge length and the signal power is lost.
9. When using a combined connector, one cable connect to the F-connector, and the 2nd using a similar method to the I-connector.
10. You can solder wires together with the support of a soldering iron and solder. Be careful not to short the wires together.
Helpful advice
You can buy a special ready-made antenna extender. It immediately has fixed connectors.
To reformat a digital television signal and transmit it to the screen of a television receiver, a special device is used - a receiver or decoder. Such systems can be easily connected to an antenna, to a cable television network and to computer networks. The quality of the image and sound on the TV will depend on the positive connection of the receiver to the antenna.

Instructions
1. Use to connect the antenna system to receiver standard input (so-called connector F). Some models of digital receivers have a high-frequency output, which allows you to connect an additional analog receiver to the same antenna.
2. When using a receiver with two inputs, connect two different antenna systems to all receiving paths. This solution improves the overall security of the system and eliminates possible failures when receiving a signal. This receiver traditionally provides for the possibility of recording on a rough disk.
3. If you are using a hybrid receiver model (cable/satellite or terrestrial/satellite), connect the antenna systems to separate receiving paths that have separate inputs and outputs.
4. After connecting the antenna to receiver Use one of the following methods to set the basic parameters using the software. First, select the required local oscillator frequency value from the list or enter the value manually.
5. Make sure that the receiver has built-in channel parameters. In this case, additional efforts to search for channels will not be needed. If the generated channel lists are not in the internal memory of the device, perform manual setup, guided by the technical documentation supplied with the device.
6. Perform the settings connected to receiver antennas. The accuracy of the settings is indicated by special indicators on the display, designed in the form of graphic objects. These can be bars of variable length or a traditional digital display. In some models, the “Signal Quality” and “Signal Level” parameters are combined into one indicator.
7. In case of disturbances and failures in signal reception, once again check that the cables are connected correctly to the appropriate connectors and that the contact is secure at the points where the system elements are connected. If necessary, correct connection problems. Do not apply significant physical effort when installing the cable.
In order for the antenna amplifier installed in the “Polish Grid” antenna housing to work, it must be connected to a power source. The amplifier is powered via a coaxial cable running from the antenna to the TV. This means we need to connect the power supply to this cable. Many users find it difficult to do this. Let's consider a simple connection option.
First you need to cut the end of the television cable (). We step back 1.5 cm from the end of the cable and carefully remove the outer insulation, trying not to damage the screen and the insulation of the central core. Remove the outer shell cut in a circle. Then we move the hairs of the screen and the foil back. Next, we retreat 0.5 cm from the moved braid and cut off the inner insulation from the central core in a circle. The cable is ready for connection.

Carefully place the cut cable into a special fastener on the power supply separator board. It is necessary that the cable braid tightly touches the lower contact pad, and the central core is inserted into the screw retainer.


We tighten the screws until the cable contacts are completely secured.
|
It is necessary to ensure that the central core and the braid do not touch under any circumstances, otherwise we will get a short circuit and the system will not work. In this case, the indicator on the power supply will light very dimly or not light at all. You also need to ensure that the braid is in close contact with the pad on the board. Otherwise, the voltage may not flow through the cable. |