The hard drive does not appear in my computer, solution to the problem. The computer does not see the hard drive. Solution Why the hard drive does not show
The situation when Hard drive not showing up in Windows, occurs quite often. The fact is that sooner or later a computer device needs to replace components, and the most popular “candidate” for replacement is the hard drive. It may happen that after replacing the hard drive, the computer does not display it. In order for the system to recognize the disk, you must use one of the following methods.
The computer does not see the hard drive: disk check
If computer doesn't see hard drive, first try to resolve this issue using standard Windows tools. Do the following:
1) Right-click on the “Computer” icon (or on the name of the same name in the “Start” menu).
2) In the window that appears, select the “Management” section, then “Disk Management”.
3) Wait a few seconds for the information to load, then right-click on the drive that is not displayed in the system and select “Change drive letter...”.
4) Click on “Change”, set the hard drive letter and save the changes by clicking on “OK”.
If you do not like the selected letter, you can repeat the above manipulations and change the letter to the original one. Very often, this procedure is enough for the operating system to recognize the hard drive.
Checking the system unit
If the PC still does not see the drive, check if all the wires are connected to that drive. To do this, turn off the computer, remove the system cover and carefully examine the wires connected to the hard drive one by one. To be sure, try unplugging them and plugging them back in. Now turn on your computer.
Driver problems
It is possible that the problem is related to the drivers. To troubleshoot, go to your motherboard manufacturer's website and download the latest drivers for your motherboard model. In the appropriate section of the site, select the board model, after which the system will select the optimal driver for it.
If you have an installation disk with the appropriate drivers from your computer (it comes with your PC), then you do not need to download anything: just insert the disk into the drive and install the drivers.
"Operating System not found" message
This strange situation also happens when the computer does not see the device, where the operating system itself is recorded. If this happens, the computer does not boot, but an error message appears on a black screen: “Operating System not found.”
To solve this problem, first check if there is any media in the drive, USB ports, floppy. If they are not there, make sure that the hard drive is connected correctly and that Windows is recorded on it. Next, do this:
1) Enter the BIOS by pressing the "DEL" key when turning on the computer and loading the operating system (different models of laptops and computers have their own hot combinations, which can be found on the Internet or in the instructions for the computer).
2) Find a menu that has the word “Boot” in its name.
3) Go to this item and in the “1st Boot Device” line, select the hard drive if the CD drive is checked there.
You can also press F12 when booting your PC and select either CD ROM or DVD ROM from the menu that appears. Then you won't need to make any changes to the BIOS.
BIOS Settings
If still Windows doesn't show hard drive, try another way - reset the BIOS settings to default. To do this, go to the BIOS and select LOAD SETUP DEFAULTS or LOAD FAIL-SAFE DEFAULTS. Then press F10 to save the setting and confirm saving by selecting YES and pressing ENTER. If the settings cannot be restored, use the battery on the motherboard for this purpose: turn off the computer, remove the system cover, remove the battery and after about five minutes put it back in place. Turn on your computer. By the way, check at the same time whether the battery is dead.
If after this the problem is not solved, look for a parameter in the BIOS called Marvell IDE Controller. You will find it in the section whose name contains the words “SATA”, “IDE”, “Device Type”. Set the value to Enabled if otherwise specified.
Disk formatting
If still Windows doesn't see the hard drive, start formatting it. However, there is one peculiarity: you need to format it not from the operating system (it doesn’t see the disk), but through special programs loaded from the BIOS.
The most popular such program is Acronis Disk Director. To boot from BIOS, download the product marked BOOT. Then burn the image to a CD (DVD), go into the program and find the disk that is not detected. If the hard drive is detected, format it by first copying the data on the disk to another medium.
By the way, this program can save you not only in a situation when the system does not show the hard drive, but also when a virus gets into the system and prevents you from entering it. If the OS is infected, go into it through the Acronis utility, download the necessary data and install a new operating system.
Service center
If all of the above did not help you, then you have only one solution left - take the disk to a service center. But before that, it’s advisable to make sure it’s working. To do this, remove the disk and try to run it on any other computer. Then you can decide whether to buy another disk or pay to repair the existing one. Good luck with your iron!
Most users create partitions on their hard drive for their convenience. They are usually called C, D, etc., and their usefulness cannot be denied in any way. Let's say you have an operating system on one volume, and all other user files (music, photos, movies) on the second. When you reinstall the OS, the partition with your files will not even be touched, which will allow you to save your data and continue to use it in the new Windows.
One of the extremely common problems that users often encounter is that the computer does not see hard drive partitions and cannot find them. This problem occurs unexpectedly and can be caused by a number of reasons that affect the operation of the hard drive. Let's figure out what to do in this situation and how to solve the problem that has arisen.
If suddenly the volume you need has not only disappeared, but the format has changed to RAW, then to solve the problem, I recommend that you familiarize yourself with.
Assigning a letter
If your PC or laptop does not see one of the hard drive partitions, then the first thing you need to do is go to the special control menu and check whether it is displayed in the corresponding list. If it is there, then it needs to be assigned a letter.
Let's look at the process in order:

The requested information will be instantly displayed on the screen. It is necessary to look through the local drives, and if there is one that has disappeared, then you need to set the letter.
To do this you need:

For the changes to be successfully applied, you need to restart your computer. As soon as the operating system boots, check whether the partition is visible, it should appear under the letter you specified.
Creating a new volume
It is likely that when you go to the management menu you will not find the missing area, instead there will be an unallocated part that cannot be assigned a letter; you can only create a new volume:

But at the same time, you will completely lose the files stored on it. Therefore, if you do not value them, then feel free to use this method; in other cases, I recommend using the method discussed below.
All processes are analyzed using Windows 7 as an example, but in other versions, Windows XP/8/10, they will be similar.
Creating a new partition
If the first method did not help and the computer still does not see the hard drive partitions, then the problem may be that the OS itself cannot see it due to the loss of the file system, as often happens, but the data on it will still be saved.
In this case, to correct the situation, we will use one very effective tool, namely the Acronis Disk Director program. With its help, we will recognize the disappeared local hard drive partition, separate a small part from it, from which we will make a new area with the NTFS file system, and then simply merge them.

This may seem very difficult to some, but if you follow the following instructions, which detail what to do in this situation, you will easily cope with this task:

After you create a partition, all that remains is to merge the problematic and new partitions using the “Merge” function.
Now you need to save the changes and reboot the system. To do this, you need to enter the BIOS again and return the boot to its original location - from the Hard Disk. After exiting the BIOS, the system will automatically boot into Windows OS. We check the disk partition again, now it should definitely be displayed correctly.
Partition recovery
In almost all cases when a logical partition of a hard drive disappears, it can be returned. For recovery we will use the same Acronis Disk Director.
So here's how to do it:

The procedure for restoring information from a partition that the PC has stopped seeing can take a significant amount of time. The duration of the process depends on the amount and volume of data available on the disk. Therefore, you should be prepared for the fact that the computer may work for quite a long time.
We hope that the methods we have listed for solving the problem are easy to implement, and you can use them to fix the problems that have arisen.
First of all, you need to decide what a hard drive is. A hard drive (called a “hard drive” in slang) is a device for storing data. In fact, all information on a computer is stored there (with a few exceptions).
The operating system and all the data to which it has access are recorded on the hard drive.
Accordingly, when the system does not detect one of these devices, all files written to it become inaccessible. Below we will describe the causes of problems and ways to overcome them.
An external hard drive may also be susceptible to the “diseases” listed below.
Diagnostic measures
If the computer does not see the disk, you need to determine the “culprits”. That is, find out whether the problem lies in the device itself or in the system. To do this, you will have to connect the hard drive to another computer.
If it recognizes the device, then the problem is in the system, but if not, then the hard drive itself is faulty. It is better to entrust further work on it to the masters. Or use warranty replacement or repair.
If the problem is in the “native” hard drive system, then there are several ways to fix it on your own. The little that you can do yourself will help you avoid spending on specialist services.
Some useful tips
- You can enter the BIOS settings by pressing the F2 or Del keys until the system starts loading;
- It is better to remember well the correct connection of cables to SATA outputs;
- It is better to wrap the hard drive removed from the system unit in antistatic agent;
- It is also better to always place the lower part of the device, which contains the boards, on an antistatic agent.
Main problems and solutions
There are a number of problems with the hard drive that you can overcome yourself. A software conflict or outgoing contacts can be corrected without contacting specialists.
Outgoing contacts
The problem may lie in a simple lack of contact. To fix it, you will need to remove the cover of the system unit and try to reconnect the cables. If there is no result, then you can use other parallel cables.
Incorrect BIOS settings
In the case where even the BIOS does not detect the hard drive, you need to look at the system date. If it is incorrect, it indicates a settings failure. Resetting the settings will help correct the situation. To do this, you will need to remove the battery on the motherboard, wait 10–30 minutes and install it back.
After these simple steps, the hard drive should be recognized as a physical device.
The problem may also be in the order of boot devices. In this case, you will not need to completely reset the BIOS settings. Just find the menu item whose name contains the word “Boot”.
It will contain a priority list of devices to boot. In this list you need to move the HDD to the first line.
Insufficient nutrition
If the device periodically disappears and appears, then you need to listen to it.
The characteristic buzzing sounds of changing operating cycles indicate a lack of power. Then you will have to purchase a more powerful power supply or turn off some less important device.
Device conflict
Two hard drives of the same brand in the system can cause conflicts. To avoid them, you need to check and configure each one in turn with a separate connection to the system.
Bus version
Versions of Windows prior to Vista may not support the SATA(SATA II) interface.
The easiest way in this case is to change the operating system to a newer one. If this is not possible, then you will still have to reinstall the OS, but with integrated drivers for SATA interfaces.
OS problem
If the BIOS detects the device, but Windows does not see the hard drive, then manual configuration using Windows will be required. To do this, proceed as follows:
1. Open “Control Panel” in the “Start” drop-down panel;
2. Double-click on the “Administration” item;
3. In the window that opens, select “Computer Management”;
4. In the list on the left, select “Disk Management”.
All connected disk devices will be displayed in the lower central part of the computer management window. One of them will be without a volume label (letters, C:, D:, etc.). Right-clicking on the tile for this drive will open a drop-down menu containing the line “Change drive letter.”
Clicking on this item will bring up a window in which you can assign a volume label in the A-Z range. After this, you should restart your computer.
Note! The cause of the malfunction may also lie in an inappropriate file system. For normal operation it must be NTFS. Information about the volume's file system can be found in the corresponding tile in the Disk Management window. If a system other than NTFS is listed there, you will have to reformat the disk.
Not a single method helped revive the “patient”? Then you cannot do without the help of specialists. The problems are much more serious and only specialists can save the hard drive.
The computer does not see the hard drive. What to do?
Why does the computer not see the hard drive and how to solve this problem? This video is dedicated to answering these questions.
Hello, dear site visitors!
It so happened that I needed to format it. It’s just that this hard drive is from a laptop, and when I gave the laptop in for warranty repairs, instead of an SSD drive I installed a HDD back. Yesterday I picked up my laptop from repair and put the hard drive back in my pocket.
I connected it to the computer on which the information was stored in order to transfer it to an external HDD, but it is not detected. Or rather, it is detected, Windows signals that a device is connected, an icon appears on the notification panel that a USB device is connected, and there is even an option to remove it.
In the device manager, the external HDD is also displayed and works properly. But the whole problem is that the disk is not displayed in Windows Explorer. You go to my computer, but it’s not there.
I connected this external hard drive to the laptop, still the same. It is detected, but it is not visible in the explorer. Yeah, that means it's the disk itself.
I thought a little, then I googled it and realized that the disk was simply not allocated and it was necessary to create a partition on it. We will create it using the standard Windows tool for working with hard drives, which I wrote about.
This could have been the end of the article, but I took a few screenshots, so I’ll show and tell you everything using a real example and how you like it – with pictures :).
We need to open the Disk Management tool. To do this, open Start and right click on Computer. Select Control.
On the left, select Disk management. And this is the picture I saw (screenshot below). Disk 0– this is my SSD drive, there are created partitions there. A Disc 1, this is already my external hard drive, which was not displayed in Explorer. It says Not distributed. Now we'll distribute it :).
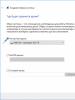
Right click on it and select Create a simple volume...
We need to specify the size for the partition we are creating. If you want to create one section, then you can not change anything, but simply click Further. The simple volume size field already indicates the maximum size for the partition we are creating.
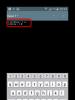
In the next window you need to assign a drive letter. I advise you to just click next and not change anything.
Formatting a volume. I advise you to leave everything as is. You can change the volume label (this is its name). Click Further.
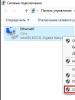
After that everything worked for me. You may have noticed (in the screenshot above), the Explorer folder for tasks has already appeared there. This is a suggestion to open the contents of your hard drive in Explorer.
And here is the HDD itself in My Computer.
That's all. All the best!
Question from a user
Hello.
Not long ago I bought a new computer (I ordered it with 2 hard drives). In order not to pay for installing Windows, I decided to do it myself, everything seems to work. But I go to “My Computer” - and I see only one drive (“C:\”) on which the system itself is installed, and the second is not there. Is it not working, or am I missing something?
By the way, when installing the system I saw two disks that could be selected for Windows. It's strange somehow...
Michael (note: contacts are worn out)
Good day!
If you were able to select both disks for Windows when installing it, then the disk is probably now invisible in Explorer due to the fact that it is not formatted (this happens all the time with new PCs/disks). As a rule, it is enough to open the special. utility in Windows "disk management" (or third-party analogues) and format it.
Below in the article I will show you how to do this step by step, and also give a number of other reasons. So...
The drive is not formatted
The most common reason: Explorer simply does not display an unformatted drive that it cannot recognize (and to which you, in principle, cannot write anything yet) . To view all “visible” and “invisible” drives connected to the computer by Explorer, you need to run the utility "disk management" .
To open it:
- press a combination of buttons Win+R;
- enter the command diskmgmt.msc to line "Open" ;
- click OK (screenshot below).

Screenshot: How to open Disk Management
Next, you will see a list of drives: usually new drives are marked “black” (as an unallocated area, see the screenshot below). To bring them into a “working” state: right-click on the unallocated area and select from the menu "Create Simple Volume" .
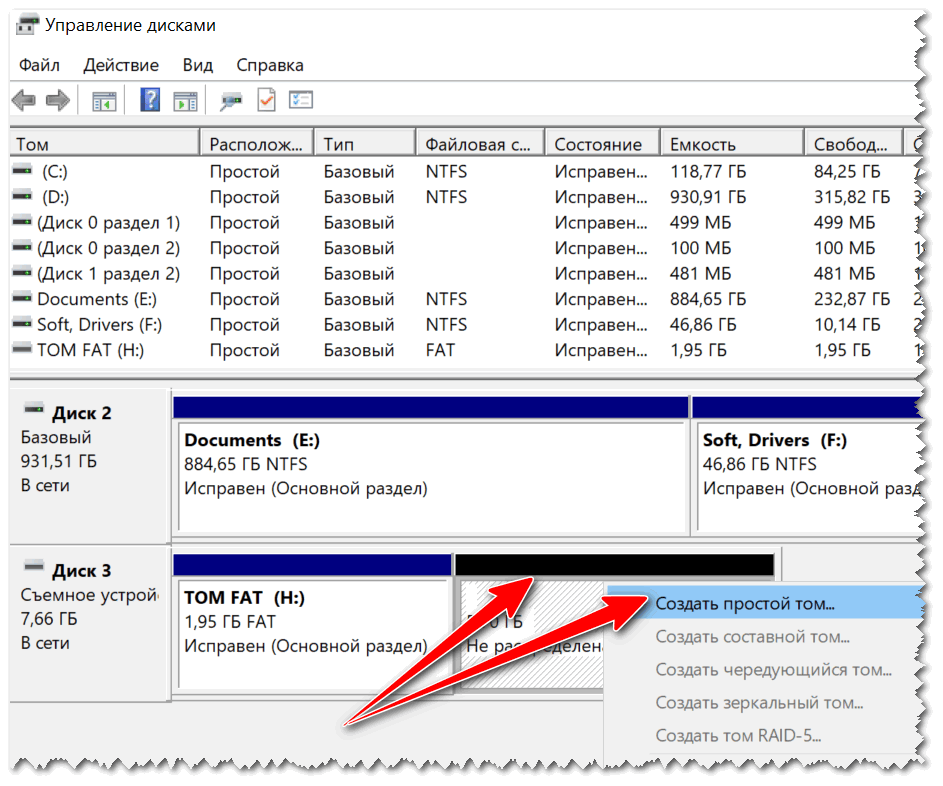
Note!
If your drive is not displayed in Disk Management, I recommend that you see if the PC was able to detect it at all. More details about this in the article below.
By the way, the created volume must be format (when formatting, most often the NTFS file system is chosen. You can see the difference between file systems).
Important! Formatting will delete all data on the drive.

Disk management - format the drive
I note that after formatting the disk becomes visible in “My Computer” (“This Computer”).

ADDITION!
In addition to the standard Disk Management utility in Windows, you can use special programs for working with hard drives. For example, AOMEI Partition Assistant, Acronis Disk Director, MiniTool Partition Wizard, etc. They are also capable of “displaying” all disks connected to the PC and formatting them.
Drive letter conflict
By default, Windows automatically assigns a specific letter to all connected drives, say, “Drive D:\” or “Drive E:\”, etc. But sometimes it happens that there is an “overlap” and the letters match (for example, the hard drive letter may match some) . Because of this, it is possible that your drive will not appear (even if it is formatted).
To fix this, simply manually change the assigned drive letter. To do this you need to open "Disk Management" (a little higher in the article it is described how this is done) and right-click on the disk name, for example, "Local D"(see example below) - select from the menu "Change drive letter or path..." .


After changes, restart your PC.
Is the hard drive visible in BIOS/UEFI?
It also happens that the disk is not visible anywhere: neither in Explorer, nor in “My Computer,” nor in “disk management,” nor in any special settings. programs for formatting drives.
In this case, you must first make sure whether the drive is visible in BIOS|UEFI. It's just that if it doesn't appear in the BIOS, then you won't see it in any Windows program...
To help!
If you don’t know how to enter BIOS/UEFI, then here is a short instruction on this topic:
In addition, usually when purchasing a laptop/PC, it comes with technical support. documentation (it also shows how to enter the BIOS and configure it).
In most cases, in modern BIOS versions information on drives is immediately visible (you don’t even need to open any partitions). See if the disk model, its capacity, and serial number are displayed.
Is the disk visible in UEFI (its model, size, etc.). In the screenshot the arrow shows the hard drive (Storage) - its model has been determined, i.e. the disk is “detected” (clickable)
What to check first
If the disk model is not defined in the BIOS (or it is not visible at all that the disk is connected), then going to Windows and trying to configure it is pointless. Most often, the problem lies in the hardware.
Outgoing contacts
First, turn off the computer and check all the cables and contacts of the disk. The most common cause of "invisibility": poor contact between the contact tracks of the disk and the cable.
By the way, if you have a used disc, take a closer look at these “tracks” to see if they are covered with dust or have become acidic. It is advisable to carefully clean them with an eraser (eraser, see screenshot below).

If you have a PC (and not a laptop, where there is no “choice”), try connecting the drive to other cables (often, when one of the cables is “loose” and does not provide a reliable connection).
Lack of nutrition
Another very common problem when connecting a second/third drive to the system is lack of power. Typical office system units suffer more from this, in which, for the sake of economy, inexpensive low-power power supplies are installed. As a result, when an additional drive is connected to the system, there may simply not be enough power for it.
How to recognize/define this?
- monitor the operation of the disk (a characteristic feature of this operation): if there is a lack of power, the disk can be detected normally, but as soon as data begins to be written to it, an error occurs and it “disappears”, becomes invisible (after a while it may “appear” again).
- you can try running the HWMonitor utility and look at the voltage surges under load: if there are “dips” of 5%-7% (or more) - the power supply clearly cannot cope;
- the easiest way: use a special device to connect the disk to a USB port (they are simply called BOX for HDD). Moreover, BOX can be of different configurations (with and without power supply): You need one that has its own power supply! If a disk with a power supply works normally, but without it it constantly “disappears” - there is a problem with the power supply.
Try connecting the drive to USB/another PC
The easiest way to check the operation of the disk (as already recommended above) is to use special. BOX. With its help, you can connect the disk to a regular USB and see how it works.
Pay attention to the BOX design: there is nothing complicated about it. As a rule, all you need to do is insert a disk into a box with a compartment, close it, connect the disk to USB and the power adapter using cables, and turn it on.
Where can I buy such a thing? In any computer store. If you're not in a hurry, you can order for pennies in Chinese online stores:

BOX for connecting the drive to a laptop/PC
You can also use another PC/laptop to recheck the disk.
To help!
How to connect a hard drive from a laptop to a computer -
Disk hardware failure
If no tricks allow you to “see” the disk, it is possible that it has simply become unusable. By the way, there are statistics that 0.1% -0.3% of disks are damaged and become unusable during “long” transportation (especially in our country, where it’s not uncommon for boxes with drives to be thrown and abandoned during unloading) . Add to this a possible manufacturing defect... Therefore, even a relatively new disk can fail, and there is nothing all that surprising in this...
If the drive is under warranty, just replace it. By the way, if you are dealing with an external HDD, do not rush to throw it away. The fact is that you can try to restore some of them: and this can often be done at home. I provide a link to the article below.
External hard drive repair at home // attempt to restore functionality -
For additions on the topic - a separate merci...
That's all for now, good luck!